Building an Active Directory Lab Environment for Real-World Network Testing and Insights
In our everyday work lives, we, as users, seamlessly access files, collaborate with others on projects, and securely log into our workstations without a second thought. Behind this seamless operation lies a digital cornerstone that is often overlooked and underappreciated: Active Directory. It is the unsung hero of organizational efficiency, silently and seamlessly authenticating users, providing resource access, managing system configurations, and much more. Yet, despite its pivotal role, it remains a mystery to many outside the realm of IT.
In the digital age, where data is king and security is paramount, understanding the importance of Active Directory is akin to unlocking the secret to streamlined operations. For most businesses, Active Directory is the backbone of their IT environment, with nearly all Fortune 1000 companies relying on it for organization (Krishnamoorthi & Carleton, 2023). It serves as the backbone of basic company functions, ensuring the smooth functionality of modern business and company operations. Some might understand the gist of what it does and how it works, but how is it really set up?
Table of Contents
Project Purpose
To gain a deeper understanding of the innerworkings of such a crucial service, I decided to build a Windows Active Directory environment. I leveraged a well-regarded demonstration by Josh Madakor to independently set up a Windows Server environment. My thanks goes to Josh Madakor for creating this project walkthrough, allowing me to partake in this hands-on learning experience on my own from the ground up.
This project aims to provide me with practical insights into the deployment, configuration, and troubleshooting of real-world network infrastructure dynamics within a basic Active Directory Environment through hands-on experience with its setup and integration. This writeup will offer insights into configuring Active Directory step-by-step on Windows Server 2019 and how various services such as AD DS, RAS, DNS, NAT, and DHCP are configured to operate together and establish a cohesive environment for centralized network access and user management.
Tools and Technologies Employed
- Oracle VirtualBox
- Windows PowerShell
- Windows 10 ISO (used to setup the client machine)
- Windows Server 2019 ISO (used to setup the Domain Controller)
- NIC (Network Interface Card) and Network Adapter setup
- AD DS (Active Directory Domain Services)
- RAS (Remote Access Service)
- NAT (Network Address Translation)
- DHCP (Dynamic Host Configuration Protocol)
Step-by-Step Walkthrough
Below is a high level overview of the project’s steps:
- Downloading and Installing Oracle VirtualBox
- Downloading Windows 10 ISO and Windows Server 2019 ISO
- Creating the First Virtual Machine to Act as the DC (Domain Controller)
- Setting Up the Network Adapters in VirtualBox
- Mounting and Installing Windows Server 2019 ISO File
- Configuring the Network Adapters / NICs
- Installing AD (Active Directory) and Creating a Domain
- Installing RAS (Remote Access Service) and NAT (Network Address Translation)
- DHCP Setup
- Running PowerShell Script to Auto-Create 1000 Users in AD
- Creating the Second Virtual Machine to Act as the Client Device Used to Connect to the DC
1. Downloading and Installing Oracle VirtualBox
The first step to setting up this environment involves downloading Oracle VirtualBox. Depending on which device/OS you are on, you may select the needed package under VirtualBox 7.0.14 platform packages. Since I am doing this project on a Windows machine, and selected the “Windows hosts” package.
We also want to download the VirtualBox Extension Pack; this can be done by clicking on the needed download link for the VirtualBox Extension Pack just below the VirtualBox 7.0.14 platform packages downloads.
2. Downloading Windows 10 ISO and Windows Server 2019 ISO
While our Oracle VirtualBox package downloads, we can download the Windows Server 2019 ISO and Windows 10 ISO file. These two files will be needed for setting up our two virtual machines, the (1) domain controller, and (2) client machine.
Windows Server 2019 file download: Click “64-bit edition” under ISO downloads for your preferred language.
Windows 10 ISO file download: Click “Download Now” under Create Window 10 installation media.
3. Creating the First Virtual Machine to Act as the DC (Domain Controller)
Once our Oracle VirtualBox download/install has been completed, we can begin setting up our first VM running Windows Server 2019. Let’s go ahead and open up VirtualBox.
From here, we can begin setting up our VM (virtual machine). If this is your first time setting up VM, VirtualBox has a manual (1.8 Creating Your First Virtual Machine) which I would highly recommend reading through to understand the process. During this VM setup, it is OK to stick to the recommended default settings during setup – just be sure that you are selecting Other Windows (64-bit) when selecting the operating system version.
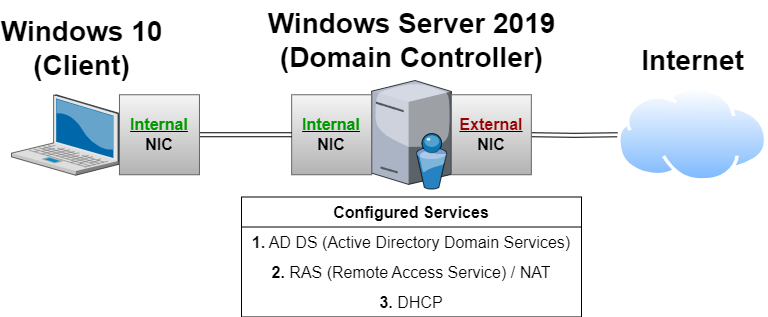
3. 1. Setting Up the Network Adapters in VirtualBox
Now, we are going to set up our two network adapters. Our first (external) adapter will be public facing and will allow our DC to connect to the Internet, while our second (internal) adapter will allow our client device to connect to our DC within our private network.
With our VM created, we can click on the settings button of our VM to the right:
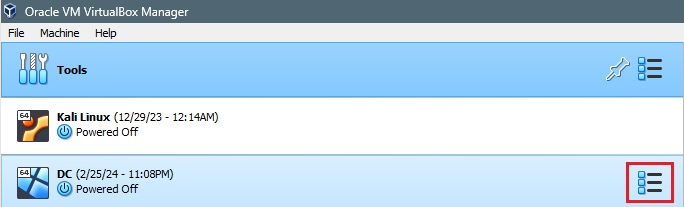
Click on Details, and then the Settings cog wheel that appears the top of the screen. Then, navigate to the Network tab within this settings menu. From here, we will be able to manage the network adapters of our VM.
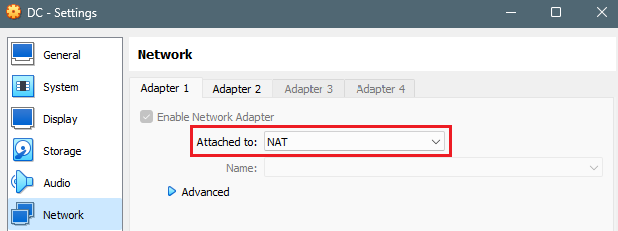
Our first adapter will be configured to be public facing and dedicated to the Internet, and automatically retrieve an IP from our home router; let’s set Adapter 1 to be Attached to: NAT
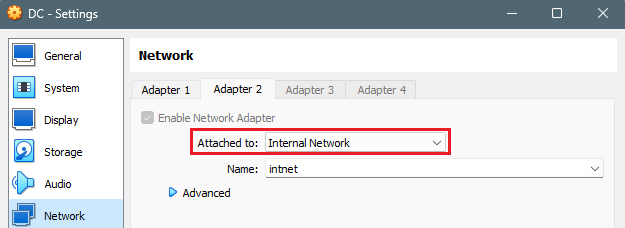
Our second adapter will be configured as the internal adapter, which we want to connect to our internal network. Because of this, this adapter will need to be manually configured later on; let’s set Adapter 2 to be Attached to: Internal Network.
3. 2. Mounting and Installing Windows Server 2019 ISO File
Once our adapters have been fully configured, we can double-click our VM to start it up and begin going through the Windows Setup process. During the boot process, we can go ahead and select the Windows Server 2019 ISO file previously downloaded as the virtual optical disk file.
Windows will begin going through its setup process – we can select all the default options and keep clicking next. The options to keep special note of selecting are the following:
- Selecting either one of the (Desktop Experience) operating systems – these will provide a GUI and not just a command line
- Custom: Install Windows only (advanced) – We are choosing this option instead of Upgrade when selecting a hard drive to install Windows onto. This is because we are formatting the hard drive from scratch and do not have an existing version of Windows running on this empty VM
3. 3. Configuring the Network Adapters / NICs
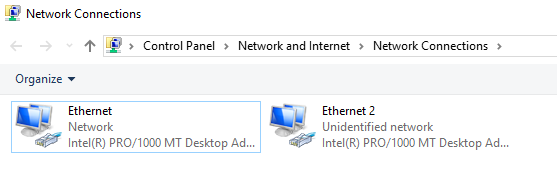
To begin configuring our network adapters (or NICs), we can type Ethernet settings into the Windows search bar, located in the bottom left corner. When we click on Change adapter options, we will see our two adapters:
Our goal here is to configure our internal NIC for our internal private VMWare Network that we will be setting up later. To do this, we first need to be able to differentiate between the two. Opening up the properties of Ethernet, I notice it is (1) referencing my Fios DNS server, and (2) has a private IPv4 address already assigned to it.
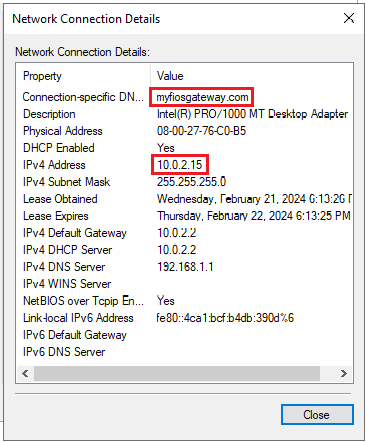
This NIC has received a private IP due to NAT, which we previously configured above in our VM network adapter settings. Therefore, this NIC is our public-facing NIC – we can name it something identifiable, and move on. If we similarly open up the properties of Ethernet 2, we will see that (1) there is no connection-specific DNS, and (2) there is no private IPv4 address assigned to it.
We can now re-name the NIC and begin setting the IPv4 settings of our internal NIC. Some important things to keep in mind when configuring these settings:
- No default gateway is required – the DC itself will serve as the default gateway for our client machine, as it has the two NICs (Internal/External)
- No alternate DNS server is required – when we install AD, DNS is auto-installed and it will set itself as the DNS server. As such, we can put its own IP address as the DNS server, or use the loopback address (127.0.0.1) to have the machine reference itself

3. 4. Installing AD (Active Directory) and Creating a Domain
With our NICs fully configured and re-named, we can finally install AD and create our domain.
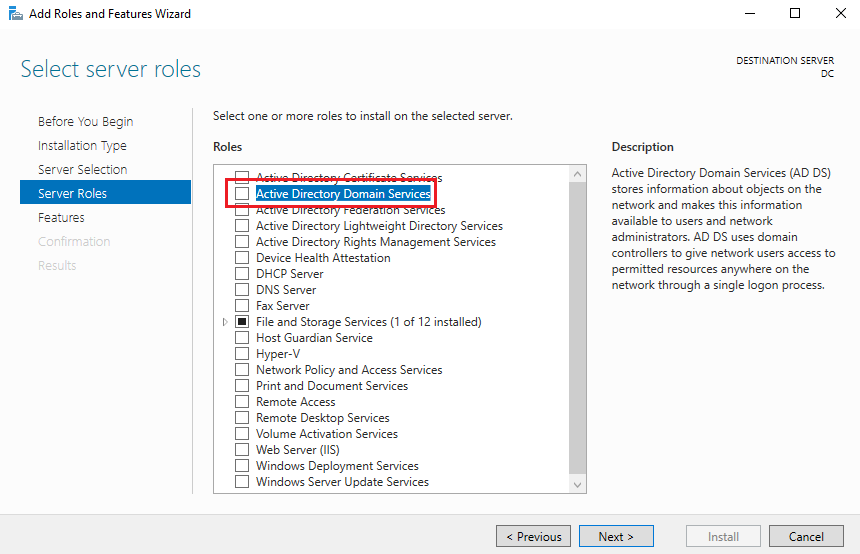
Type Server Manager into the Windows search bar (if not already open). Once opened, click Add roles and features. The Add Roles and Features Wizard allows you to install various features, services, and roles on your DC, and what we will be using to setup AD, RAS, NAT, and DHCP.
Keep clicking next until you arrive at the page for installing new Server Roles. We want to select Active Directory Domain Services, as shown here:
Keep clicking next and going through the needed steps. Eventually, you will reach a page to begin/complete the install:
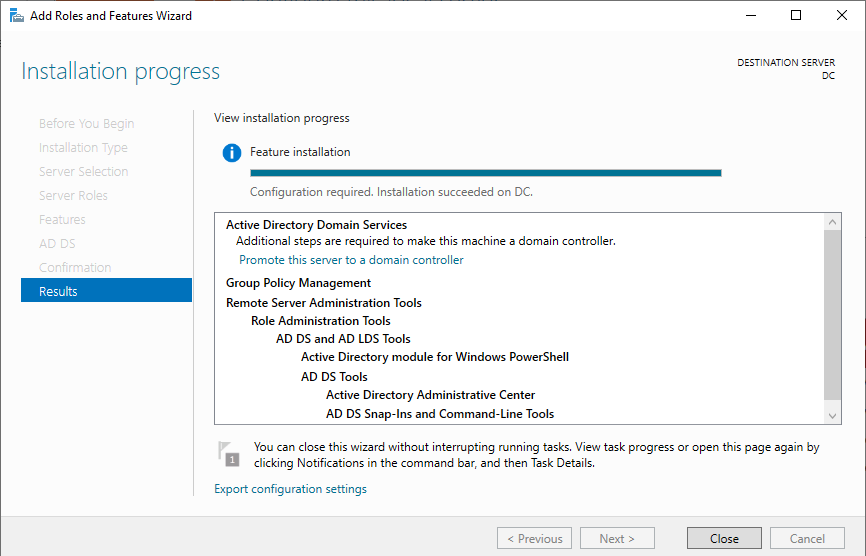
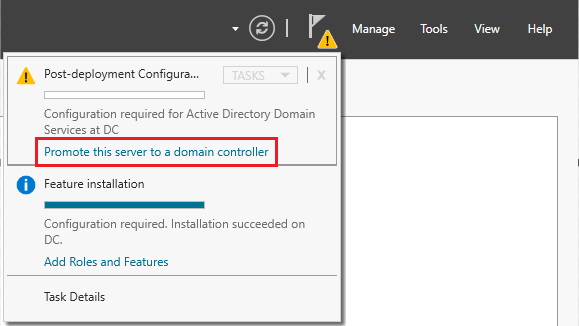
Now that we’ve installed the software for AD DS, we need to create our domain. This domain will allow us to establish new administrative boundaries, allowing us to centrally manage network resources, policies, and directory services specific to that domain. We can start doing this by going to the top right corner of the Server Manager window, clicking on the flag, and then Promote this server to a domain controller:
Next, we will need to select Add a new forest ➜ Set root domain name (naming your domain). After this, you will arive at a page titled Domain Controller Options. Enter and confirm your password, and continue clicking next until you are prompted to install. Your machine will automatically restart to apply these changes.
When arriving at the login screen this time around, you will see your admin account is now a part of the domain you created: <Your Domain>\Administrator
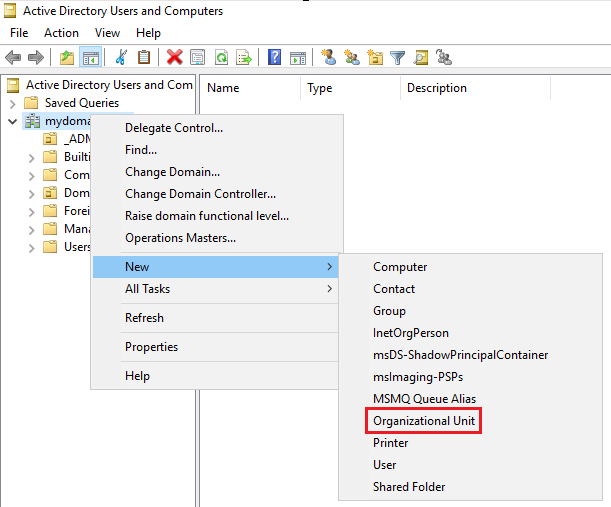
To manage our newly created domain, we can type Active Directory Users and Computers into the Windows search bar. Once opened, we will see our newly created domain. The last thing we want to do now is create a domain admin user so we can install the rest of our services. Right clicking on the domain icon provides us with many options; we will create an Organizational Unit to act as a “folder” for an Admin user (which we will also be creating right now).
Once the Organizational Unit has been created as a folder and named, we can right click it and then click on User to go through the process of creating our admin user. Once we’ve finished creating our user, we will see it within our folder:

To turn this user into a domain admin, we can do the following: Right click the user ➜ Properties ➜ Member Of ➜ Add ➜ Type “domain admins” into object names field ➜ Check Names ➜ OK ➜ Apply
Once the user has been updated to a domain admin, let’s log out of the DC and then log into that account. When we arrive at the login page, we can select Other User, and sign in with our domain admin credentials.
3. 5. Installing RAS (Remote Access Service) and NAT (Network Address Translation)
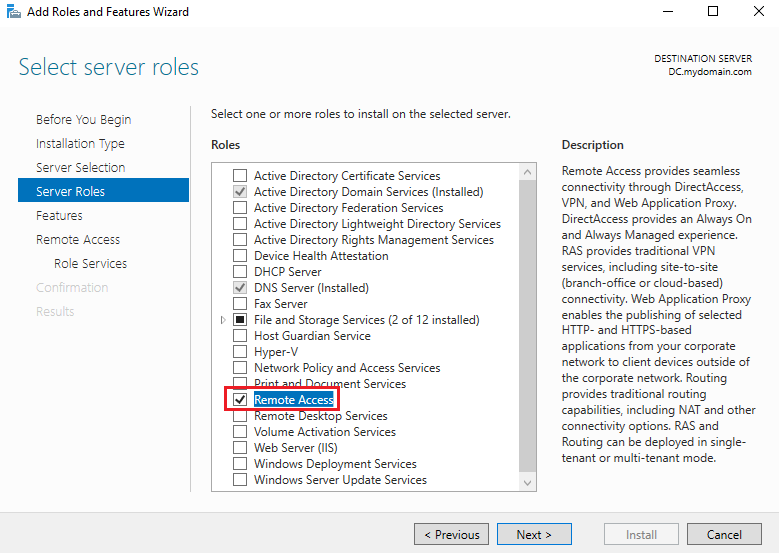
Setting up RAS and NAT will allow our internal Windows 10 client on our private virtual network to access the Internet through the DC. To do this, we will go back to the Add roles and features section of our Server Manager, this time, selecting Rremote Access when selecting server roles:
We also want to select Routing as a service on the next page. This is the service that will be providing support for NAT:
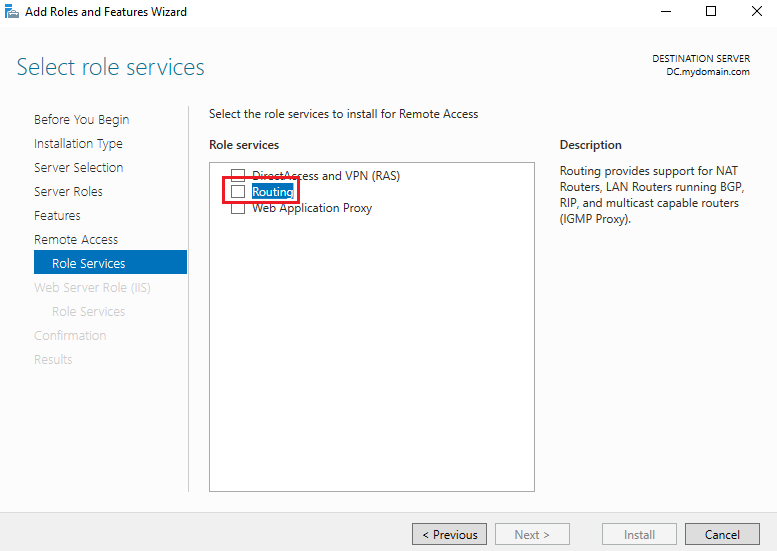
From here, you can keep clicking next and continue until you complete the install for these services.
Once the installation has been complete, we’ll be navigating to Routing and Remote Access to configure NAT to allow our internal clients to connect to the Internet using a public IP address. This can be found by clicking on Tools at the top right of Server management, and finding Routing and Remote Access within the dropdown.
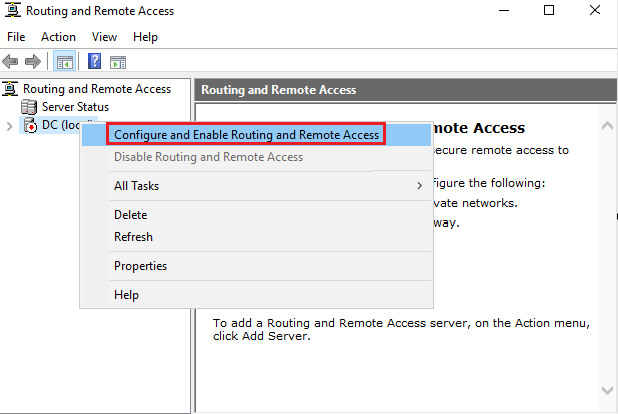
Once Routing and Remote Access has been opened, we will need to right click DC (local) and click on Configure and Enable Routing and Remote Access to begin going through the Routing and Remote Access Setup Wizard:
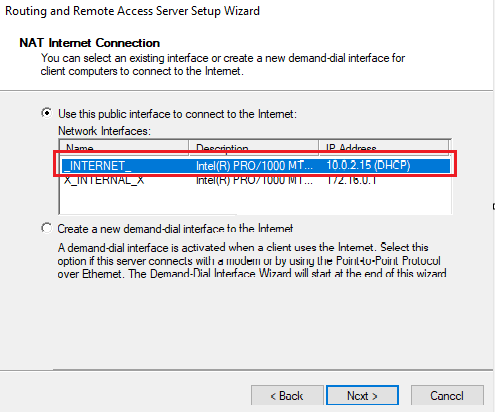
On the Configuration screen, we can select Network address translation (NAT) as our service to enable. Afterwards, on the NAT Internet Connection screen, we can select our public-facing NIC as the interface to be used:
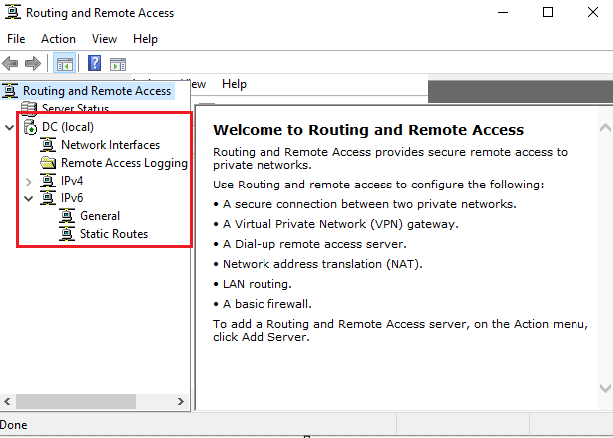
Once fully set up, the Routing and Remote Access services/icons will re-populate, and a green arrow underneath the DC will show that RAS/NAT is fully configured and ready to go:
3. 6. DHCP Setup
The purpose of setting up DHCP is to allow our internal Windows client to automatically receive a temporary dynamic IP address, allowing it to begin browsing the public Internet. Without DHCP configured, devices that connect to a network or domain controller will not have an IP, and a static IP address would need to be set manually each time.
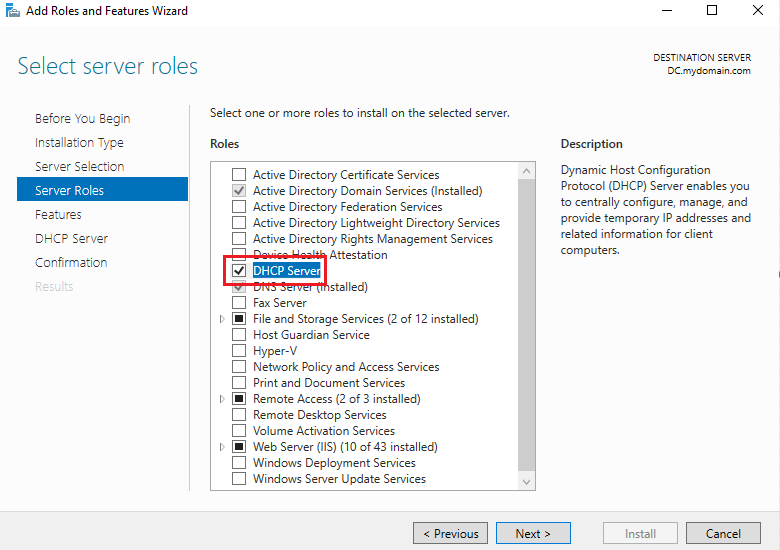
To set up DHCP, we will go back to the Add roles and features section in the Server Manager. As before, we will go through the setup wizard until we arrive at the server roles installation page, where we can now select DHCP Server as our final service/role to install:
There is nothing else that needs to be set – we can keep clicking next until we are able to start the install. Once the install completes, we can navigate to our DHCP control panel by going to Tools (top right of Server Manager) ➜ DHCP
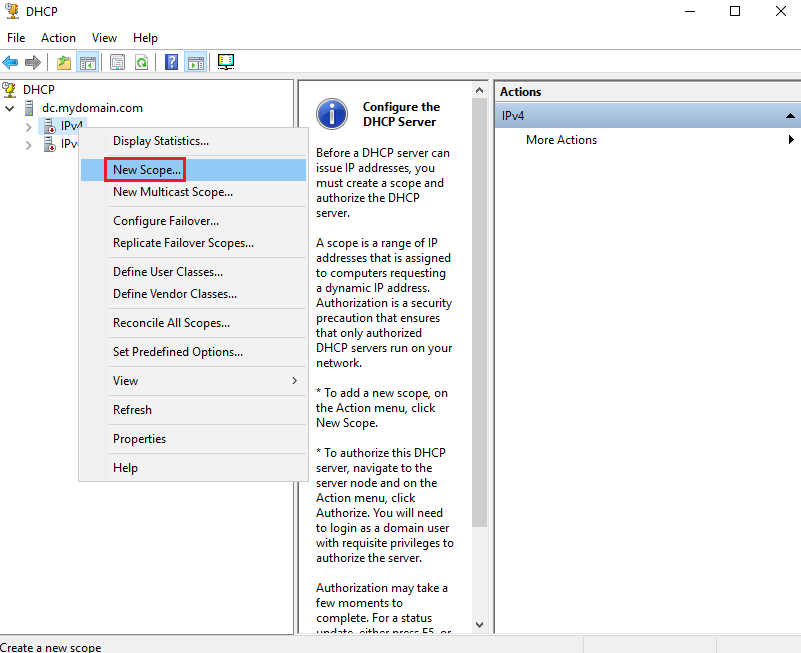
To begin setting up DHCP, we will create a scope in the IPv4 DHCP server that will provide IPs in a given range. To do this, we can do the following:
Open the domain controller dropdown ➜ Right Click “IPv4” ➜ New Scope
A scope is a range of IP addresses assigned to devices requesting a dynamic IP address; if we set a scope for a given IP range, only IPs within that scope will be assigned to these devices. The scope that we will be setting for this environment will be 172.16.0.100-200, as this is an internal IP address range that will suffice.
On the Scope Name page, we will be prompted to provide an identifying scope name. I decided to name the scope the same as the range (172.16.0.100-200). On the next page, we will be prompted to define the scope itself:
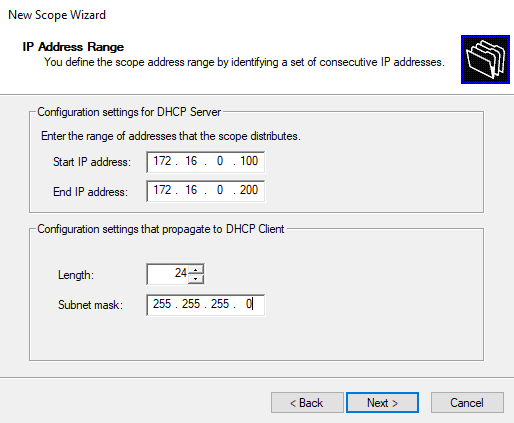
The 255.255.255.0 subnet mask with a length of 24 is equivalent to a CIDR notation of /24, which is a commonly used allocation of IP addresses within a LAN due to its useful and efficient nature. Often used in small to medium-sized LANs, it (1) strikes a good balance between conserving IP addresses and providing enough IP addresses for devices on a network, and (2) also aligns with the Class C addressing scheme (which is one of the most commonly used address classes for smaller networks). In a lab environment, the conservation of these IP is not a concern, however, this subnet mask is a traditional scheme that many individuals will utilize, and as such, is one that we will use.
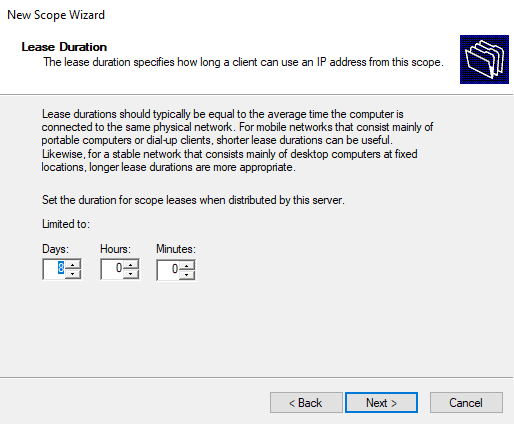
The next page you see will be for setting the lease duration, which specifies how long a client is provided with an IP address from the scope. By default, the duration is set to 8 days. In this lab environment, we’re only testing with one device, so we don’t really need to worry about lease durations.
On the next page, we are prompted to specify the router (default gateway) to be used. Remember that our DC currently has an external NIC to allow it to connect to the Internet, and we previously configured our DC’s internal NIC so that our client is able to connect to it. As such, we will be adding the DC’s IP address as the default gateway, since it will be the one acting as the gateway for our internal client to connect to the Internet:
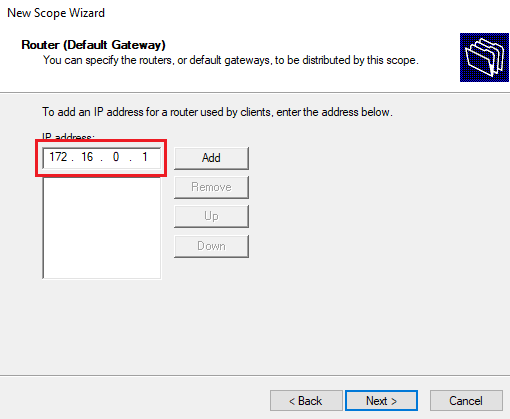
Be sure to click Add before clicking Next.
The final page for configuring DHCP will ask us what server we want to use as our DNS server. Because installating AD automatically installs DNS, we will need to use our DC as our DNS server or we will be unable to join the domain. It will already be entered in, so we can simply select Next.
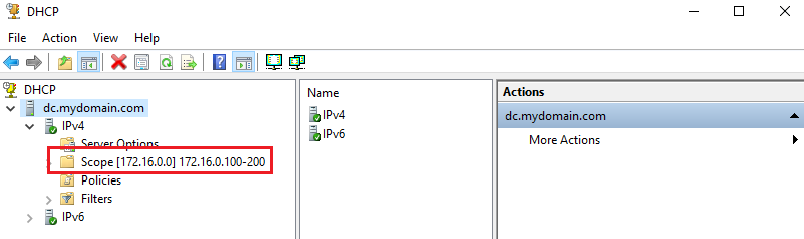
Once the setup has been fully finished, we can go back to the DHCP page (Open the domain controller dropdown ➜ Right Click “IPv4” ➜ New Scope), right click the DC dropdownr, click Authorize, and then Refresh to see the scope updated under the expanded IPv4 dropdown:
3. 7. Running PowerShell Script to Auto-Create 1000 Users in AD
In any type of server environment, the amount of Internet access is limited by default in order to decrease exposure to any potential security threats and overall reduce its attack surface; as such, there are also many default configurations that forbid unauthorized (potentially harmful) actions from occurring. Using PowerShell scripts to create users in an Active Directory environment is quite common, and can be considered safe if done properly – because we are in a lab environment, we will be bypassing some of these warnings.
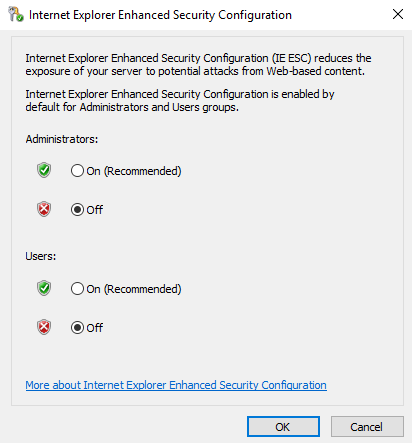
The first we want to do is configure the Internet Explorer Enhanced Security Configuration to be turned off, so that we are able to browser the web and download the script we want to run via Josh Madakor’s github, designed for this project’s purpose. To do this, we can click on Configure this local server in the Server Manager quick start (above the Add roles and features we’ve been referencing throughout this walkthough).
Then, we can click on IE Enhanced Security Configuration: On on the right hand side. You will now see the Internet Explorer Enhanced Security Configuration screen. You can see these settings are set to “On” by default to reduce exposure to potential attacks from Web-based content. Here, we want to change both options to Off so that we can browse the web, and hit OK:
Now, we will be able to browse the Internet and download the needed script. Josh Madakor has provided his publicly shared PowerShell script tailored specifically for this lab environment use-case. You can download it via the link below:
https://github.com/joshmadakor1/AD_PS/archive/refs/heads/master.zip
Once the script has been downloaded and the zip file extracted, let’s navigate to Windows Powershell. This can be done by doing the following: Click Windows Start Menu ➜ Right-click Windows PowerShell ISE ➜ More ➜ Run as administrator
Opening and manually running the script within the files will cause an error – this is a Windows security measure set by default to prevent any unintentional or malicious PowerShell code from being executed on your host machine. As mentioned previously, because this is a lab environment, we can ignore this and run the following command to change the execution policy and bypass these restrictions:

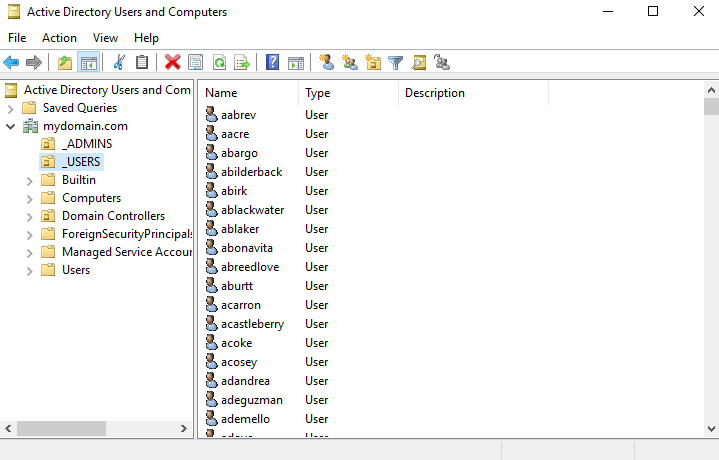
After running the command, you will be prompted with another message regarding our command changing the execution policy, as a precaution. We can select Yes to All to proceed running this script. After we run the script again, we will see the output of the users being created within our PowerShell terminal. When the script has finished running, we can go back to our Active Directory Users and Computers and view our previously created Users folder to see all of our newly created users:
Now that our DC is fully set up with AD, RAS, NAT, DHCP, and our created users, we can move onto creating our second VM, which will be our internal Windows 10 client. We will be able to use this machine to log into the domain with one of our created domain accounts.
4. Creating the Second Virtual Machine to Act as the Client Device Used to Connect to the DC
To set up our second VM, we will be following the same steps as we did when creating our first VM. As before, it is OK to stick to the recommended default settings during setup. However, this time around, we want to select Windows 10 (64-bit) when selecting the operating system version.
We also want to set our network adapter/NIC settings accordingly. Instead of using NAT and connecting to our home network, we will be changing the network adapter to be Internal Network so the device can receive an IP from the DHCP server and access the Internet via the DC. The VM network adapter settings can be set by following: Settings ➜ Network ➜ Adapter 1 ➜ Attached to: Internal Network
4. 1. Mounting and Installing Windows 10 ISO
Once done, we can boot up the VM. When prompted for mounting an OS, we can select our Windows 10 ISO file, which was originally downloaded in Step 2 of this documentation.
The Windows 10 setup is lengthy but not difficult to complete. I would highly recommend checking out the video How to install Windows 10 in VirtualBox 2024 by TopNotch Programmer for completing this process as seamlessly as possible.
4. 2. Re-naming and Connecting the Client Machine to the Domain
Once our Windows 10 machine is fully set up and we have gotten to the desktop screen, the first thing we want to check is making sure our machine is connected to the Internet. We can do this by opening up the Command Prompt and typing ipconfig. Here, we want to look for an IPv4 Address, Subnet Mask, and Default Gateway:
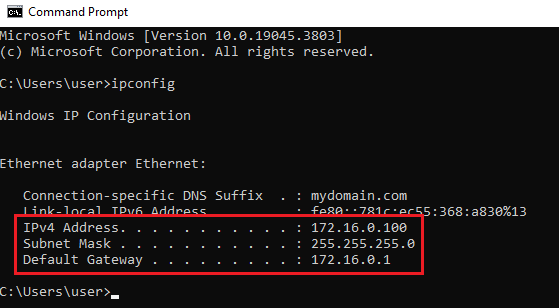
At this point, we can ping any live website within the Command Prompt (ex. ping google.com) to see if there is a ping reply and the request resolves. If we receive a response after pinging a site on the Internet, we know that our DNS server is configured properly and all our infrastructure is working together/functional. We can also ping our domain here (ping mydomain.com) and it will resolve.
Now that we are able to confirm our Internet is working, let’s go ahead and re-name our device and add it to our domain.
Right-click Windows Start menu ➜ System ➜ Scroll down and click “Rename this PC (advanced)” ➜ Change
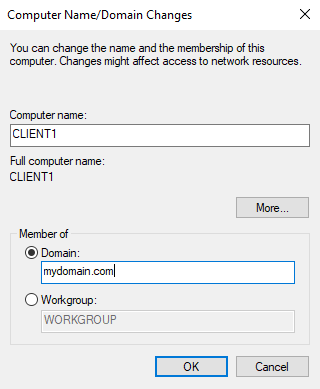
Once we entered a computer name and selected/entered our domain into the domain field and click OK, we will be prompted to enter the credentials of one of the domain admin accounts we previously created. Once entered, we receive a confirmation message of the account being added to the domain, and will be required to restart the machine in order for the changes to be made.
4. 3. Fully Testing and Checking for Functionality
With everything being set up and our Internet fully tested, let’s run through some final checks. Let’s go back to our Windows 2019 Server machine (our first VM) and go to Active Directory Users and Computers. We can click on the Computers folder to see that our Windows 10 client is now a member of our domain:
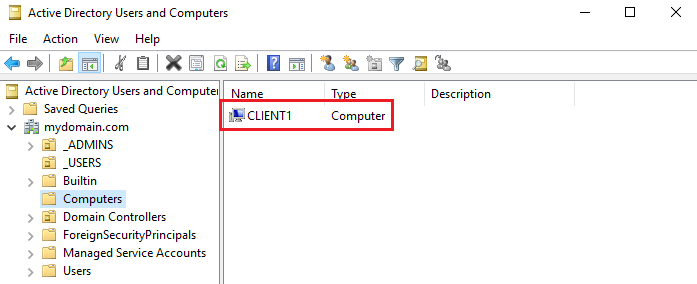
This means we are should now be able to use any of the accounts we have within our _USERS folder to log into that client machine (with the user’s respective credentials, of course). How awesome is that?
Let’s now go back to our users folder and choose a user / account to log in with:
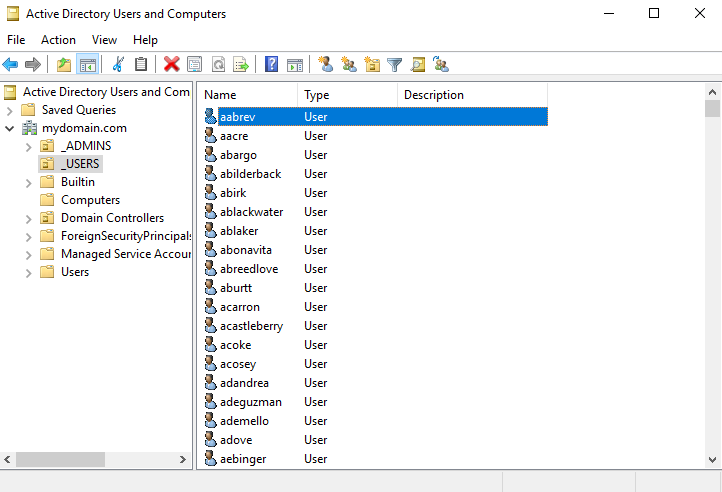
I am going to select the user aabrev (username) here for login testing. In the script that was run to create these users, a default password of “Password1” was set During the login on our Windows 10 client, we will be selecting Other user and entering the necessary credentials:
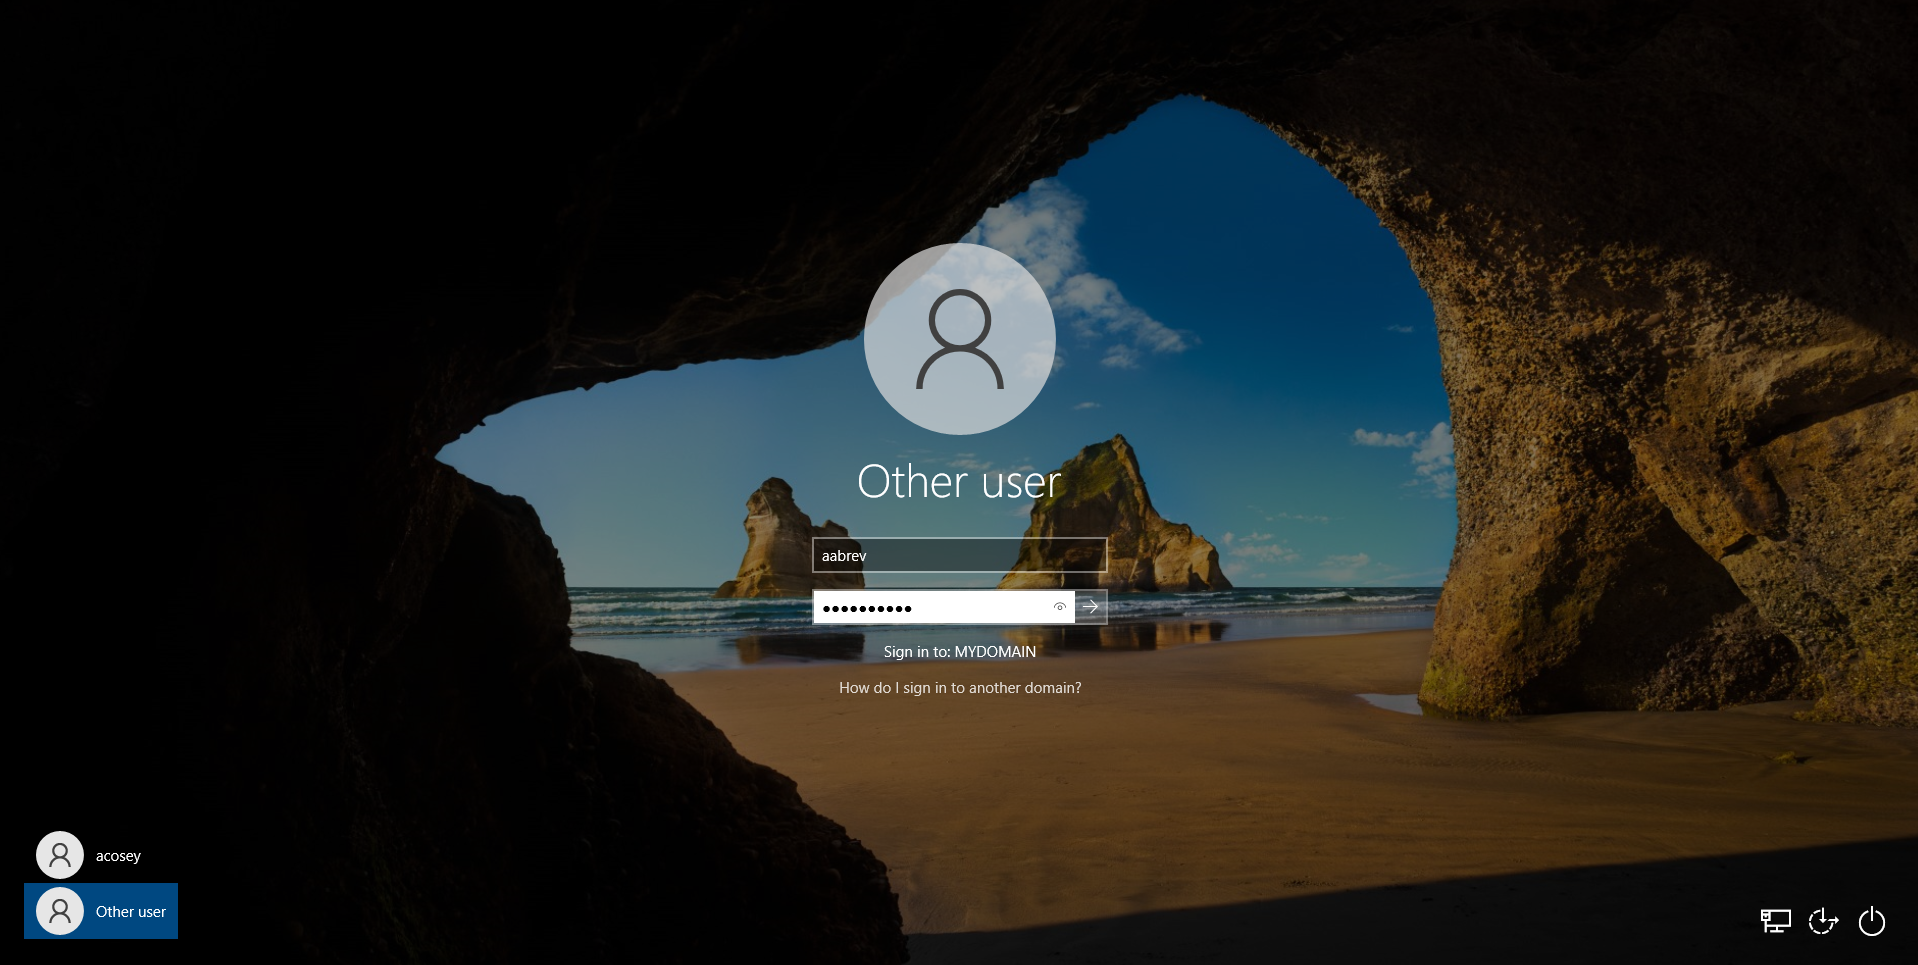
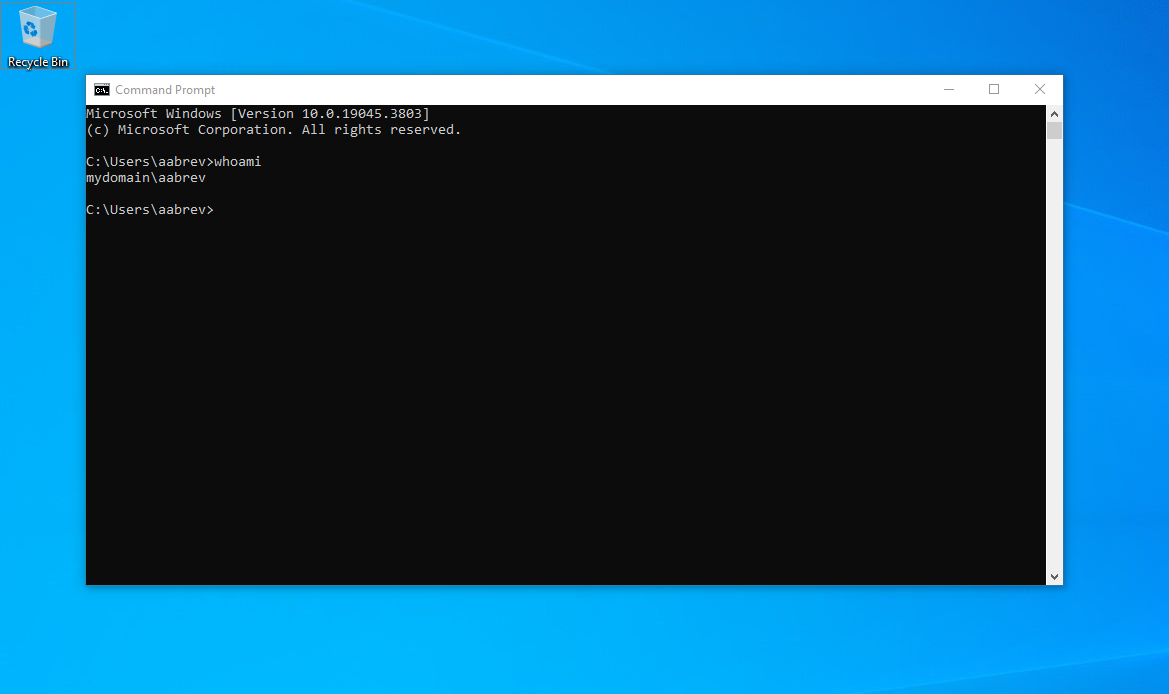
Once you’ve logged in, you should start seeing the Windows setup process begin – in a few seconds, you will be logged in. We can do a quick whoami in the Windows Command Prompt to see that we have indeed logged in as that user!
Results Achieved
Building this Active Directory Environment provided the following accomplishments:
1. Built a Multi-Tier Virtual Network: Set up a virtual environment using Oracle VirtualBox, deploying two virtual machines: a domain controller (DC) and a client machine, simulating a real-world network infrastructure.
2. Established Secure Network Communication: Configured network adapters for both virtual machines, enabling secure and isolated communication between the domain controller and client machine within a private virtual network.
3. Provisioned Windows Server/Clients: Installed and configured Windows Server 2019 on the domain controller and Windows 10 on the client, ensuring user-friendly administration interfaces for efficient management.
4. Deployed Active Directory: Successfully installed and configured Active Directory Domain Services (AD DS), creating a centralized hub for managing network resources, user permissions, and directory services within the domain.
5. Enabled Remote Access and Internet Connectivity: Configured Remote Access Service (RAS) and Network Address Translation (NAT) on the domain controller, allowing secure remote access and internet connectivity for the client machine.
6. Automated Network Configuration:Implemented Dynamic Host Configuration Protocol (DHCP) via scripting, automating IP address assignment for network devices, ensuring seamless connectivity without manual intervention.
7. Streamlined User Creation and Management: Successfully utilized a PowerShell script to automate the creation of 1000 users within the Active Directory, significantly reducing administrative workload and streamlining user management.
8. Integrated Client Machine into Domain: Successfully joined the client machine to the domain, enabling users to leverage domain credentials and access centralized resources.
9. Conducted Rigorous Functional Testing: Performed comprehensive testing to validate network connectivity, domain integration, user authentication, and overall functionality of the environment.
This project culminated in a fully functional Active Directory virtual environment, replicating essential network services like remote access, automated user provisioning, and centralized resource management. This simulated domain serves as a valuable training ground for users and administrators alike, mimicking real-world network scenarios. By building this environment, I gained a deep understanding of Active Directory’s internal structure, from core services to user/group management and troubleshooting best practices.
Closing Thoughts
Completing this project has been a fulfilling experience that has significantly reinforced my understanding of network infrastructure setup. This project outlines the importance of attention to detail in building a realistic Windows environment – from configuring network adapters to conducting thorough testing and troubleshooting and ensuring the functionality of the installed services, each step was executed to ensure seamless functionality and efficiency.
Moreover, this project has not only honed my technical and hands-on skills with one of the core components of Windows-based network infrastructure, but also deepened my appreciation for the interplay between different network components. The integration of domain services, coupled with thorough testing to verify functionality, was a very rewarding experience, and has provided me with the confidence to tackle more complex network setups in the future.
Overall, this project serves as a testament to the value and effectiveness of hands-on learning and experimentation when it comes to mastering theoretical technical concepts and implementing them into practice. This project has provided great insight into understanding the logistics of Active Directory and will act as a great foundation for working on new ideas. It has inspired me to partake in implementing future cybersecurity-based Active Directory projects, and I one day look to focus on hardening this environment and utilizing additional frameworks/tools such as centralized monitoring/logging and Federated Services Implementation.
Source Citations
Krishnamoorthi, S., & Carleton, J. (2023, December 7). Active Directory Holds the Keys to your Kingdom, but is it Secure? Frost & Sullivan. https://www.frost.com/frost-perspectives/active-directory-holds-the-keys-to-your-kingdom-but-is-it-secure/
Kinzer, K. (2023, September 6). What is Active Directory Domain Services? JumpCloud. https://jumpcloud.com/blog/ad-ds
Josh Madakor. (2021, January 4). How to Setup a Basic Home Lab Running Active Directory (Oracle VirtualBox) | Add Users w/PowerShell [Video]. YouTube. https://www.youtube.com/watch?v=MHsI8hJmggI